Over the last few months, I’ve refined my process for editing AI-written articles.
Each one takes less than 30 minutes to edit now.
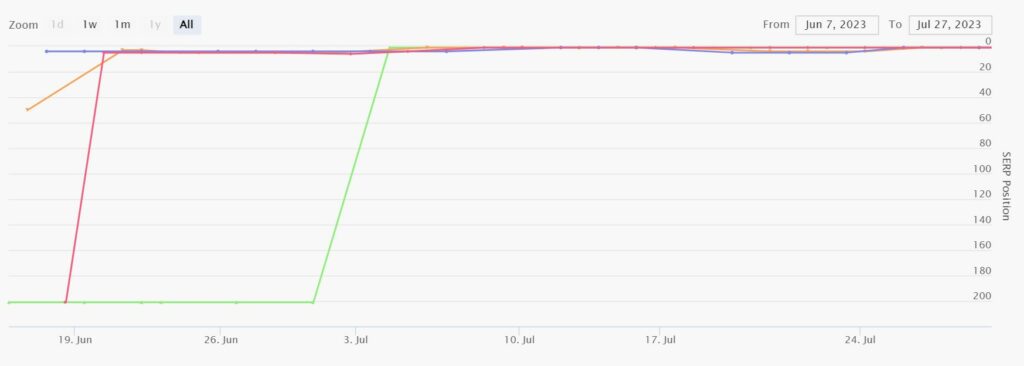
In many cases, my articles jump straight to #1 on Google within days.
In this post, I’ll share my exact process, step-by-step.
Let’s jump right in!
To generate content in the first place, I use Machined and Koala. Both tools provide top-notch quality content (as far as AI content goes!)
I use Machined to create content clusters that are automatically interlinked. The automatic internal linking aspect saves me a lot of time, since I don’t have to manually find an dlink to other articles in the cluster.
I use Koala to create individual pieces of content (not in a specific cluster).
Editing AI-written content step-by-step
1. Remove/edit anything obvious
A quick glance through the article might reveal a few things you want to remove. Like a weirdly-placed heading or link.
2. Fact-check the article
For topics that can have a major impact on your readers (like anything health-related) it’s best to do this manually or by hiring an expert. I don’t recommend using AI to create this sort of content though.
In most cases, you can just use ChatGPT to fact-check. I recommend installing the Wolfram and ScholarAI plugins for this as they’ll provide ChatGPT with more information. If you don’t know how to use ChatGPT plugins, read this.
You’ll want to use the GPT-4 model for this. Here’s the prompt:
To the best of your knowledge, is the following article factually accurate on all accounts? If not, please list the inaccuracies and provide the correct facts instead. Here is the article:

[paste your article here]
Don’t paste a link to your article. Paste the entire thing.
If ChatGPT says your article is factually correct, move on to the next step. Otherwise, you’ll want to fix your article. You can always ask ChatGPT to help with that too. 🙂
3. Remove unnecessary summarizations
AI often adds unnecessary “mini conclusions” or summaries throughout an article. I almost always remove these as they provide no additional value.
You can paste your article in ChatGPT and ask it to remove unnecessary summaries, but it may remove things you want to keep. Instead, I prefer to ask it to list summarizations and then I’ll make the decision whether to remove them.
Here’s the prompt I use:
Are there any sentences or paragraphs in the following article that simply summarize what was said earlier in the article?

[article]
If you’re wondering, yes, I almost always remove the entire final conclusion since it usually doesn’t add anything to the article that wasn’t already said. Keep in mind this is just a personal preference.
4. Remove “fluff”
We’ve all seen AI content littered with fluff. Extra stuff that’s boring to read and not necessary to say. Machined and Koala are pretty good about not including extra fluff, but it can still happen.
Here’s a super simple prompt to check for fluff:
Is there any unnecessary “fluff” in the following article?

[article]
If the “fluff” adds any value (new information, or even casual, human-sounding wording and humor) I typically keep it. Otherwise, I’ll remove it.
You can have ChatGPT help remove it, but if you just ask it to remove all the fluff, it’ll remove too much. So, make sure to specify exactly what you want it to remove.
5. Break up large paragraphs
In my opinion, no paragraph should have more than 3 sentences. Most should be one or two sentences. This helps improve readability. No one likes to read a wall of text.
You can do this manually or with the help of ChatGPT. Here’s a prompt:
Please break up the paragraphs in the following article. No paragraph should have more than three sentences. Ideally, each paragraph should be just one or two sentences in length. Keep all headings.

[article]
Honestly, I prefer doing this manually. That way I don’t have to paste the fixed article back into WordPress and reset all the headings (ChatGPT doesn’t keep H2s, H3s, etc.) Plus, the manual route only takes a minute or two.
6. Add internal links
If you need to add internal links and don’t have access to LinkWhisper or a similar internal linking tool, you’ll have to do so manually (with the help of ChatGPT).
Find an article (or a list of articles) you want to link to from the article you’re editing.
Ask ChatGPT to identify words or phrases in your article that could be linked to an article about [topic] (this is another article on your site you want to link to).
Use this prompt:
Find a word or phrase in the given article that could link to another article about [topic]. If no such words or phrases exist, write a new sentence or paragraph where a link would fit. Also, indicate where this new content should go in the article.

[article]
Repeat this for other articles you want to internally link to.
7. Add external links
It’s super important to link out to authoritative sites. But these external links need to be relevant.
For example, if you mention something off-handedly but don’t have time to go into more detail within your article, that’s a great opportunity to link to a more in-depth article on the subject.
Using the following prompt, it’s easy to find places in your article that could benefit from an external link.
Please recommend 20 words or phrases in the article below that could be externally linked to provide readers with more information.

[article]
Some suggestions won’t be great, but there should be a few that would work well.
Search the topic, find an authoritative source, and add a link to it from your article.
If you want more suggestions, just ask ChatGPT to provide more suggestions.
8. Generate a meta description (optional)
This step is optional because Google will automatically generate a meta description for you from the text of your article. Even if you specify a meta description, Google may STILL choose to display something else.
Still, it’s worth specifying a meta description especially if you rank on the first page and want to improve click-through rates.
Here’s the prompt:
Please write a brief meta description of 160 characters or less for the following article. Include the phrase "[your target keyword]"

[article]
9. Add images to your article
You can generate images with AI using tools like Koala or Canva (both have free AI image generators).
For some topics however, AI images aren’t up to snuff. You’ll have to use real images instead.
You can either use your own images (recommended) or if you don’t have any, you can use creative commons licensed images. Make sure to add proper attribution in the image caption though.
I like to add more than one image per article. People are visual. More images will keep readers on the page longer and improve ad RPM.
For the featured image, I go to Canva, make a design with dimensions of 1200×630, and find an image that works for my article.
10. Finishing touches
The last edits I make are:
- Assigning the article to the correct category.
- Editing the title.
- Making sure the article slug (URL) is my target keyword, with no other words added.
- Making sure all images have alt text that describes the image and if possible, uses my target keyword (or at least part of it).
All the edits above typically take me about 30 minutes now that I’ve done it a bunch of times.
I’m sure there’s room for improvement in my editing process, but I hope you found it helpful.
Let me know if you have any additions to my process, thoughts, or questions. Thanks for reading!